


If you’ve ever struggled with harsh shadows, uneven lighting, or reflections ruining your product shots, you’re not alone. DIY light box photography has become one of the most accessible and budget-friendly ways to elevate your images from amateur snapshots to professional-quality visuals. Whether you’re a small business owner photographing handmade products, a hobbyist capturing miniature figurines, or an aspiring photographer refining your craft, building your own light box opens up a world of creative possibilities without the steep price tag of commercial studio equipment.
In this comprehensive guide, we’ll walk you through everything you need to know about constructing and using a homemade light box for photography — from the basic materials and build process to advanced techniques that will make your images stand out in a crowded digital landscape.
What Is DIY Light Box Photography?
A DIY light box — also known as a light tent, photography cube, or glow box — is a simple enclosed structure made from translucent materials that diffuses light evenly around a subject. The core principle is straightforward: instead of pointing a direct light source at your object, which creates hard shadows and hot spots, the light passes through a white fabric or acrylic panel, scattering uniformly in every direction. This produces a soft, wraparound illumination that minimizes unwanted reflections and highlights fine details.
For product photography lighting, this approach is a game-changer. E-commerce sellers, Etsy artisans, and social media creators rely on light boxes to present items cleanly and consistently. The beauty of building one yourself is that you can customize the size, shape, and material to match the exact type of photography you do.
Why Build a DIY Light Box for Photography?
Before diving into construction, let’s explore why so many photographers choose to build their own light diffuser setups rather than purchasing pre-made solutions.

- Cost savings: A commercial light box can cost anywhere from $30 to $200 or more. A DIY version can be built for under $15 using household items.
- Customization: You control the dimensions, panel materials, and number of light openings to suit your specific subject matter.
- Portability: Many DIY designs are collapsible and lightweight, making them easy to store or take on location.
- Learning opportunity: Building your own setup teaches you the fundamentals of light diffusion, which translates to better understanding of studio lighting in general.
- Scalability: Need a larger box for bigger products? Simply adjust the materials. Want a miniature version for jewelry? Scale it down.
Materials You’ll Need to Build Your Own Light Box
The great thing about DIY light box photography is that the materials are inexpensive and easy to find. Here’s a curated list of what you’ll need for a basic yet effective setup:

- Cardboard or foam board — A large, sturdy box or sheets of foam board form the structural frame. Avoid thin cardboard that warps easily.
- White translucent fabric or parchment paper — This serves as the diffuser panel. Shower curtains with a white finish, white bed sheets, or even wax paper work in a pinch.
- Box cutter or scissors — For cutting clean, precise openings in your structure.
- Transparent tape or hot glue — To secure panels and fabric in place.
- White matte spray paint (optional) — Painting the interior white helps maximize light reflection inside the box.
- LED desk lamps or clamp lights — Positioned on the sides and top, these serve as your primary light sources.
- A small tripod or phone mount — Keeps your camera steady for sharp, well-composed shots.
Step-by-Step Guide to Building a DIY Light Box
Step 1: Choose and Prepare Your Base
Start with a cardboard box that’s slightly larger than the objects you plan to photograph. Cut off the flaps at the top to create a flat opening. If you want a bottom opening for a tabletop setup, leave the bottom intact. For a fully enclosed cube, seal all edges with tape.
Step 2: Cut Out Windows
Using your box cutter, cut rectangular openings on three sides and the top of the box. These windows will be covered with your diffusing material. A common configuration uses three side panels and one top panel, leaving the bottom open for camera positioning.
Step 3: Attach the Diffuser Panels
Stretch your white translucent fabric or parchment paper taut over each opening and secure it with tape or glue. Make sure there are no wrinkles — even small creases can create uneven lighting patterns that show up in your final images.
Step 4: Set Up Your Light Sources
Place two LED lamps on either side of the box at roughly a 45-degree angle. Position a third light or reflective surface above the top opening. If you’re using a single light source, a piece of white foam board propped inside the box can bounce light onto shadowed areas.
Step 5: Position Your Camera and Subject
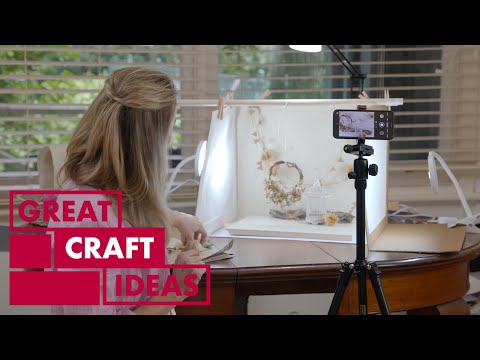
Place your subject inside the box on a small turntable or a piece of white cardstock. Mount your camera on a tripod directly above the bottom opening or at the side, depending on your design. Shoot through the open window or bottom panel.
Best DIY Light Box Design Ideas for Different Skill Levels
Not all light box projects are created equal. Here are three designs ranging from beginner-friendly to advanced, so you can pick the one that matches your experience and goals.
| Design | Difficulty | Best For | Cost Estimate |
| Cardboard Box Light Tent | Beginner | Small products, flat lay photography | $5–$10 |
| Foam Board Collapsible Cube | Intermediate | E-commerce product shots, social media content | $15–$25 |
| Wooden Frame with Acrylic Panels | Advanced | Professional product photography, studio use | $40–$75 |
The cardboard box design is perfect for beginners who want immediate results with minimal effort. The foam board collapsible cube adds portability and a cleaner aesthetic. The wooden frame with acrylic panels is the gold standard for those who want a permanent, professional-grade setup that will last for years.
Pro Tips for Stunning Light Box Photography
Having a well-built light box is only half the equation. Here are expert-level tips that separate decent product photos from truly stunning ones:
- Use white balance presets: Set your camera’s white balance to match your light source temperature (usually around 5500K for daylight LEDs) to avoid color casts.
- Shoot in RAW format: This gives you maximum flexibility to adjust exposure and white balance during post-processing without losing image quality.
- Experiment with light placement: Moving a lamp even a few inches can dramatically change the shadow direction and highlight placement on your subject.
- Add a backdrop insert: Swapping the bottom panel for black cardstock creates dramatic, moody shots, while white produces clean, minimalist product images.
- Avoid mixing light temperatures: Combine only lights of the same color temperature to prevent inconsistent color casts across your frame.
- Use a remote shutter release: This eliminates camera shake and lets you shoot long exposures if needed for darker setups.
DIY Light Box vs. Commercial Light Boxes: A Comparison
| Feature | DIY Light Box | Commercial Light Box |
| Price Range | $5–$75 | $30–$250+ |
| Customization | Fully customizable | Fixed dimensions and design |
| Build Time | 30–90 minutes | Zero (ready to use) |
| Portability | Varies by design | Usually lightweight and foldable |
| Durability | Depends on materials used | Generally higher quality materials |
| Light Diffusion | Requires manual adjustment | Pre-engineered for optimal diffusion |
For most hobbyists and small business owners, a DIY photography light box delivers 90% of the results at 10% of the cost. Commercial options become worth the investment when you need consistent, repeatable results at scale or require features like built-in light stands and adjustable panels.
Common Mistakes to Avoid When Using a DIY Light Box
- Using fabric that is too thin: Very thin materials can create a “hot spot” where light passes through too intensely, creating an uneven glow. Opt for multiple layers of tissue paper or a thicker white sheet.
- Ignoring the background: A messy or dark background inside the box draws attention away from your subject. Keep interior surfaces clean and neutral.
- Overloading with lights: More light doesn’t always mean better results. Too many sources can flatten the image and eliminate all depth and dimension.
- Not cleaning the diffuser panels: Dust and fingerprints on the fabric scatter light unpredictably, creating speckles in your photos.
- Shooting at too high an ISO: With a controlled light setup, keep your ISO low (100–400) for the cleanest, noise-free images.
FAQ: Long-Tail Questions About DIY Light Box Photography
How do I take product photos with a DIY light box without shadows?
The key is to position your lights at 45-degree angles on both sides and add a reflector opposite your main light source. If shadows persist, move your lights further away from the box — closer lights create harder shadows, while farther lights produce softer gradients that fade naturally.
Can I use a DIY light box for smartphone photography?
Absolutely. Many smartphone cameras now rival entry-level DSLRs in low-light performance. Just make sure to disable your phone’s flash, use a timer or voice command to avoid shake, and consider downloading a manual camera app for better exposure control when shooting inside your homemade glow box.
What size DIY light box should I build for product photography?
For most small-to-medium products like cosmetics, crafts, or electronics, a cube measuring approximately 18×18×18 inches works perfectly. For larger items like clothing or oversized packaging, scale up to 24×24×24 inches or build a rectangular version with a wider base. The rule of thumb is to leave at least 4–6 inches of space between your subject and the diffuser panels.
Is it worth building a DIY light box for Etsy sellers?
Yes, without question. Etsy shoppers are highly visual, and clean, well-lit product images significantly increase click-through rates and conversions. A homemade light box gives you professional-looking photos that build trust and make your listings stand out from competitors who rely on ambient or flash photography.
How can I improve the light diffusion in my DIY light box setup?
Layer your diffusing material — two or three sheets of white parchment paper or a double-thickness white bed sheet dramatically softens the light. You can also spray the interior walls with matte white paint to create a reflective bounce surface that fills the box with even, shadow-free illumination from every angle.
Final Thoughts on DIY Light Box Photography
Building and using a DIY light box for product photography is one of the most rewarding skills you can develop as a photographer or small business owner. It requires minimal investment, no technical expertise, and delivers professional results that rival expensive studio setups. The process of designing your own light tent teaches you how light behaves, how diffusion works, and how small adjustments can transform an ordinary photo into something extraordinary.
Start simple with a cardboard box, experiment with different materials and light positions, and gradually upgrade as your skills and ambitions grow. The journey from a basic homemade light box to a refined photography studio is one of the most fulfilling paths in creative work — and every image you capture along the way will be better for the effort you put in.