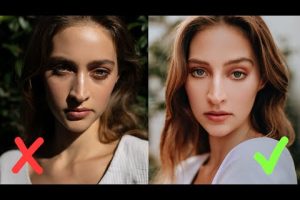



There is a reason photographers say that light is the most important element in any image. Without proper lighting, even the most expensive camera gear, the most skilled editing workflow, and the most talented subject can fall flat. Good lighting photos have a way of drawing the viewer in—revealing texture, depth, emotion, and color with a clarity that no post-processing trick can fully replicate. Whether you are shooting a portrait in a sunlit window, capturing a product for an e-commerce store, or composing a landscape at golden hour, understanding how light behaves is the single biggest leap you can take toward elevating your work. This guide dives deep into the principles, techniques, and practical strategies behind creating photographs that truly shine, covering everything from foundational concepts for beginners to advanced setups that seasoned professionals rely on every day.
Why Lighting Makes or Breaks Your Photographs
Before you explore specific techniques, it helps to understand why lighting holds so much power over a photograph. Light defines the mood, shape, and dimension of every image. It controls where the viewer’s eye travels, what details stand out, and what falls into shadow. Harsh, direct light creates dramatic contrasts and sharp shadows, while soft, diffused light wraps gently around subjects for a flattering, forgiving look. The direction, intensity, color temperature, and quality of light all work together to tell a story before a single word is read. When lighting is poorly managed, photos can look flat, washed out, or unnaturally dark. When it is handled skillfully, even a smartphone snapshot can feel cinematic and intentional.
The Science Behind Good Lighting in Photography
At its core, good lighting in photography comes down to a few measurable properties. Intensity refers to how bright or dim the light source is. Direction describes where the light hits the subject relative to the camera. Quality determines whether the light is hard (producing sharp shadows) or soft (creating gradual transitions). Color temperature, measured in Kelvin, influences whether a scene feels warm and golden or cool and clinical. Understanding these four pillars gives you the vocabulary to diagnose problems and craft intentional lighting setups every time you pick up a camera.
Types of Lighting for Stunning Photos
Natural Light Photography Techniques

Natural light is the most accessible and often the most beautiful light source available. The sun changes constantly throughout the day, offering a wide range of qualities that can transform the same subject in dramatically different ways. Golden hour, the period shortly after sunrise or before sunset, bathes scenes in warm, low-angle light that is soft and richly colored. Blue hour, which occurs just before sunrise or after sunset, provides a cool, ambient glow perfect for moody and atmospheric images. Overcast days act as a giant softbox, scattering light evenly and eliminating harsh shadows—making them ideal for portrait and product photography outdoors.
To make the most of natural light, pay attention to the direction of the sun. Front lighting illuminates the subject evenly but can look flat. Side lighting adds depth and texture by revealing contours and surface details. Backlighting creates silhouettes, rim effects, and a dreamy glow around the edges of your subject. Positioning yourself and your subject relative to the sun—rather than simply pointing the camera at it—is the difference between an ordinary photo and a compelling one.
Artificial Lighting Essentials

When natural light is unavailable or insufficient, artificial lighting gives you complete control. The most common types include continuous lights such as LED panels and softboxes, and flash-based lights like speedlights and studio strobes. Continuous lights are excellent for beginners because you can see the effect in real time, while strobes deliver powerful bursts of light that freeze motion and allow for faster shutter speeds in studio environments.
A basic artificial lighting setup typically includes a key light (the primary source that illuminates the subject), a fill light (which softens the shadows created by the key light), and a backlight or hair light (which separates the subject from the background). Modifiers like diffusers, reflectors, and grids shape the light further, allowing you to fine-tune the quality and spread of illumination.
Natural Light vs. Artificial Light: A Side-by-Side Comparison
Choosing between natural and artificial lighting depends on your subject, environment, and creative goals. The table below highlights the key differences to help you decide which approach suits your needs best.
| Factor | Natural Light | Artificial Light |
| Availability | Dependent on time of day and weather | Available anytime, anywhere |
| Cost | Free | Requires investment in equipment |
| Control | Limited; must adapt to conditions | Full control over intensity, direction, and quality |
| Portability | Naturally portable | Requires carrying and setting up gear |
| Consistency | Changes constantly | Stable and repeatable |
| Best For | Lifestyle, outdoor portraits, landscapes | Studio work, product photography, events |
The most skilled photographers rarely choose just one—they learn to blend both sources for results that feel natural yet deliberately crafted. For example, using a reflector to bounce natural sunlight onto a shadowed face during an outdoor shoot combines the beauty of daylight with the precision of a controlled fill source.
Mastering Light Direction and Positioning
Where you place your light source relative to the subject and camera is one of the most impactful decisions you will make. Each lighting angle produces a different emotional and visual effect, and learning to recognize these patterns will dramatically improve your ability to shape a scene.
- Front Lighting – Illuminates the subject head-on, minimizing shadows and creating an even, clean look. Best for beginners and straightforward documentation-style shots.
- Side Lighting – Strikes the subject from the left or right, creating dramatic contrast and emphasizing texture. Ideal for dramatic portraits and architectural detail shots.
- Backlighting – Places the light source behind the subject, creating silhouettes or a luminous halo effect. Perfect for editorial and fine-art photography.
- Top Lighting – Casts shadows downward, often used for fashion and beauty work but can be unflattering for faces if not diffused.
- Rembrandt Lighting – A classic portrait technique where the key light is positioned at a 45-degree angle above the subject, creating a characteristic triangle of light on the shadowed cheek.
Advanced Lighting Setups for Professional Results
Once you have mastered the basics, exploring advanced setups will take your images to the next level. Three-point lighting remains the gold standard for portraits and video, using a key light, fill light, and backlight to create depth and separation. Butterfly lighting, where the key light is placed directly above the camera and slightly above the subject’s head, produces a butterfly-shaped shadow beneath the nose and is a favorite among fashion and beauty photographers.
For product photography, light tents and strip softboxes provide even, wraparound illumination that minimizes harsh reflections and highlights product details cleanly. In portrait work, experimenting with negative fill—placing a black flag or card on the opposite side of the key light—allows you to deepen shadows and add mood without increasing light output. These techniques require practice, but the results are immediately noticeable and professionally impressive.
Expert Tips for Consistently Great Lighting Photos
- Shoot during the right time of day. Early morning and late afternoon offer the most flattering, warm light for outdoor photography.
- Use a reflector to fill shadows. A simple white or silver reflector can transform harsh contrast into balanced, natural-looking illumination.
- Pay attention to white balance. Incorrect white balance can make your lighting look unnatural, even when the exposure is perfect.
- Diffuse harsh light whenever possible. A sheer curtain, a bedsheet, or a professional diffusion panel softens direct sunlight and creates a more flattering quality of light.
- Observe light before you shoot. Spend a few minutes studying how light falls on your subject and surroundings before pressing the shutter.
- Experiment with mixed lighting. Combining natural and artificial sources—such as adding a LED panel to complement window light—gives you creative flexibility and a polished, layered look.
Frequently Asked Questions
What is the best lighting for portrait photography?
Soft, directional light works best for portraits. This can be achieved through natural light during golden hour, a large window with sheer curtains, or a studio softbox positioned at a 45-degree angle to the subject. The goal is to wrap the face in gentle light that reveals features without creating harsh, unflattering shadows.
How can I take good lighting photos with just a smartphone?
Smartphones excel in well-lit environments. Position your subject facing a large window for soft, natural light, avoid direct overhead sunlight, and use the exposure lock feature to prevent the camera from automatically adjusting brightness. A simple white foam board held opposite the window acts as an effective reflector for fill light.
What is the difference between hard light and soft light?
Hard light comes from a small, direct source and produces sharp, well-defined shadows with high contrast. Soft light comes from a larger or diffused source and creates gradual shadow transitions with lower contrast. The size of the light source relative to the subject determines softness—larger sources relative to the subject produce softer light.
How do I fix bad lighting in post-processing?
While good lighting should always be prioritized at the capture stage, you can recover some issues in editing. Tools like luminosity masking, shadow recovery, and highlight adjustment in Lightroom or Capture One help balance exposure. Adding a subtle radial or gradient filter can simulate the effect of a fill light to brighten shadow areas selectively.
Why do my photos look flat even with good lighting?
Flat photos often result from light coming directly from the camera or from a lack of directional contrast. Moving your light source to the side or above the subject, adding a reflector for shadow depth, or incorporating a subtle backlight for separation will instantly add dimension and visual interest to your images.
Conclusion
Creating good lighting photos is not about having the most expensive equipment or the most elaborate studio setup—it is about understanding how light works and learning to use it intentionally. From harnessing the gentle warmth of golden hour to mastering a three-point studio configuration, every decision you make about light shapes the final image in meaningful ways. Start by observing how light behaves in your everyday environment, practice positioning your subject relative to the source, and gradually introduce modifiers and artificial tools as your confidence grows. With patience, curiosity, and a keen eye for illumination, you will soon find that light itself becomes your most powerful creative tool, transforming ordinary scenes into extraordinary photographs that truly stand out.